At this point we have a new Visual Studio project and are ready to begin the process of adding user interface components to our application. At the moment our Windows Form (entitled Form1) is empty. The next step is to start dragging components from the Toolbox to the Form.
To access the Toolbox click on the Toolbox tab located along the left hand edge of the main Visual Studio window. This will display the Toolbox which contains a number of different categories of components available for addition to the Form.
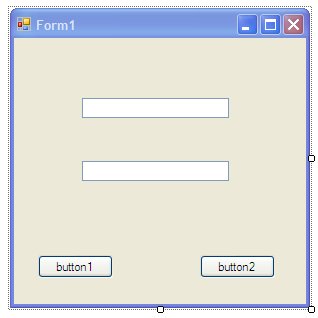
If the All Common Components category is currently folded click on the small + sign to unfold the list of components. With the components visible drag and drop two Button components and two TextBox components onto the Form canvas position and resize them such that the Form appears as shown in the following figure.
Repeat the above task by selecting each component in the Form in turn and changing the (Name) property. The second textBox should be named nameText, the left hand and right hand buttons helloButton and closeButton respectively.
Changing Component Properties
In addition to changing the names of components it is also possible to change a myriad array of different properties via the properties panel. To demonstrate this concept we will change the text on the two buttons such that they read "Hello" and "Close". Select helloButton in the Form, scroll down the list of properties to locate the Text value and change it from button1 to Hello. Repeat this for closeButton so that it displays Close.
To try out the application so far press the F5 button on your keyboard to build and run the application. After a few seconds the executing application will appear. Enter some text into the TextBoxes to prove it is a live application.
Adding Behavior to a Visual Studio C# Application
The next task in creating our application is to add some functionality so that things happen when we press the two buttons in our form. This behavior is controlled via events. For example, when a button is pressed a Click event is triggered. All we need to do, therefore, is write some code for the Click events of our buttons. To display the code associated with the closeButton double click on it. The display will change to show the code for the application. Amongst the code is the closeButton_Click event method:

When the closeButton is pressed by the user we want the application to exit. We can achieve this by calling the Close() method in the closeButton_Click event:
        private void closeButton_Click(object sender, EventArgs e)
        {
            Close();
        }
The next task is to read the text entered into nameText and use it to display a message in welcomeText. This will take place whenhelloButton is pressed. Click on the Form1.cs [Design] tab above the code area to return to the visual view of the Form and double click onhelloButton to access the code. This time we will be adding code to the helloButton_Click event method to read the value from nameText, combine it with some extra text and then display the result in welcomeText:
       private void helloButton_Click(object sender, EventArgs e)
       {
            welcomeText.Text = "Hello " + nameText.Text;
       }
We will learn more about what is happening in the above method in later chapters but in summary we are setting the Text property of thewelcomeText component to a string comprised of a string containing "Hello " and the Text property value of the nameText component.
Build and run the application by pressing F5 and when the application runs enter your name into the second text field and press the Hellobutton. The hello message will subsequently appear in the top text field. Press the Close button to exit the application.
You have now built for first GUI based C# application and are ready to begin learning the basics of the C# programming language in C# Variables and Constants.
No comments:
Post a Comment